Wednesday, March 26, 2025

Woodworking Furniture Plans for Custom-Made Living Room Pieces

Posted by myname with No comments

Woodworking Furniture Plans for Custom-Made Living Room Pieces

The living room, often considered the heart of the home, deserves furniture that reflects personal style and functional needs. While mass-produced furniture offers convenience, custom-made pieces crafted from meticulously chosen wood provide a level of quality, uniqueness, and longevity unmatched by commercially available options. This comprehensive guide delves into the design and construction aspects of various living room furniture pieces, providing a framework for woodworking enthusiasts to create bespoke elements for their homes.
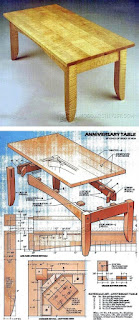
Designing Your Custom Living Room Furniture

The design process forms the bedrock of any successful woodworking project. Careful planning ensures efficient material usage, minimizes errors, and ultimately results in a piece that meets the intended aesthetic and functional requirements. This phase involves several crucial steps:

Defining Your Style and Needs

Before sketching a single line, it is essential to clearly define the desired style and functionality of the furniture. Consider the overall aesthetic of your living room: Is it minimalist, traditional, rustic, modern, or eclectic? The chosen style will dictate the type of wood, joinery techniques, and finishing methods employed. Furthermore, assess your practical needs. Will the sofa need to accommodate a large family? Does the coffee table require ample storage? A thorough understanding of these factors will guide design decisions.

Sketching and Dimensioning

Once the style and function are established, begin sketching preliminary designs. Start with simple line drawings, focusing on the overall proportions and layout. Refine these sketches, adding details such as leg designs, drawer pulls, and ornamentation. Accurate dimensioning is critical. Use a scale ruler and accurately measure all components. Consider the ergonomics of the piece; will the height and depth of the sofa be comfortable? Will the coffee table be easily accessible? Detailed sketches serve as a blueprint during construction.

Material Selection

The choice of wood significantly impacts the final product's appearance, durability, and cost. Hardwoods such as oak, maple, cherry, and walnut offer exceptional strength, durability, and beauty, but they tend to be more expensive. Softwoods like pine and fir are more budget-friendly but may require more careful handling due to their lower density. Consider the wood's grain, color, and potential for finishing. Sample various wood species before making a final decision to ensure it complements the living room's existing décor.

Constructing Key Living Room Pieces

This section outlines the construction of three essential living room pieces: a coffee table, a sofa, and a bookcase. Each piece requires specific joinery techniques, tools, and finishing methods.

Building a Custom Coffee Table

A coffee table serves as a central focal point in many living rooms. A simple yet elegant design might incorporate a solid wood top supported by four sturdy legs. Consider adding shelves for storage or a drawer for remotes and other small items. The construction might involve:

  • Mortise and tenon joinery: This classic technique provides exceptional strength and durability, ideal for connecting the legs to the table frame.
  • Dovetail joinery: For drawers, dovetail joints offer both strength and aesthetic appeal. The interlocking nature of these joints ensures a tight, durable fit.
  • Wood glue and screws: Reinforce the joints with wood glue and screws for added stability and longevity.

Crafting a Comfortable Sofa

Building a sofa presents a more complex challenge, requiring advanced woodworking skills and potentially specialized tools. Consider a frame-and-panel construction, where a sturdy hardwood frame supports the cushions and backrests. Key considerations include:

  • Frame construction: A robust frame is paramount. Use strong hardwoods, reinforced with corner blocks and dowels.
  • Upholstery: Upholstery requires specialized skills and materials. Consider using high-density foam for comfortable seating and durable fabrics for the covering.
  • Spring system: For superior comfort, incorporate a spring system under the cushions. This adds support and resilience.

Constructing a Functional Bookcase

A bookcase provides both storage and aesthetic appeal. A simple design might involve vertical panels and horizontal shelves supported by dadoes or rabbets. Features such as adjustable shelves enhance versatility. Essential construction steps include:

  • Dado joints: Dadoes provide a strong and visually appealing method for joining the shelves to the vertical panels.
  • Rabbet joints: Similar to dadoes, rabbets create a clean, strong connection between the shelves and the uprights.
  • Back panel: A back panel can be added for stability and to prevent items from falling through.

Finishing Your Custom Furniture

The finishing process significantly enhances the appearance and durability of your handcrafted furniture. Careful attention to detail during this phase ensures a professional-looking result. The process typically involves:

Sanding

Begin by sanding the wood to a smooth finish. Use progressively finer grits of sandpaper, starting with a coarser grit to remove imperfections and ending with a fine grit for a silky smooth surface. Pay close attention to corners and edges.

Applying Stain or Paint

Apply stain or paint to enhance the wood's natural beauty or create a desired color. Follow the manufacturer's instructions carefully for optimal results. Multiple coats may be necessary to achieve even coverage and desired depth of color.

Applying a Protective Finish

Apply a protective finish such as polyurethane or varnish to protect the wood from scratches, moisture, and UV damage. Choose a finish that complements the overall style and provides the desired level of protection. Multiple coats, lightly sanded between each coat, are recommended for maximum durability.

Conclusion

Creating custom-made living room furniture offers a rewarding and fulfilling woodworking experience. By carefully planning the design, selecting appropriate materials, and employing precise construction techniques, you can transform your living space with unique, high-quality pieces that reflect your personal style and enhance your home's aesthetic appeal. Remember to prioritize safety and precision throughout the entire process to ensure a successful and enjoyable project. The effort invested will be well rewarded with the satisfaction of owning handcrafted furniture that will last for generations.

Build a charming country hutch with step-by-step instructions

Posted by myname with No comments

Constructing a Charming Country Hutch: A Comprehensive Guide

This detailed guide provides a comprehensive approach to crafting a charming country-style hutch, suitable for both experienced woodworkers and enthusiastic beginners. The project, while involving several steps, is designed to be manageable and rewarding, resulting in a beautiful and functional piece for your home.

Phase 1: Design and Material Preparation

1.1 Establishing Dimensions and Design Elements

Before commencing construction, meticulously plan the dimensions of your hutch. Consider the available space, desired storage capacity, and overall aesthetic. A typical country hutch boasts a combination of open shelving and closed cabinets. Sketch your design, noting the height, width, and depth of the main structure, the number and size of shelves, the dimensions of the cabinets (if included), and the style of the doors (paneled, glass-fronted, or a combination). Consider incorporating decorative elements such as crown molding, turned legs, or decorative hardware to enhance the charming country appeal. Accurate measurements are paramount to a successful outcome. Use graph paper for precise sketching and detailed measurements.

1.2 Selecting Suitable Lumber

The choice of lumber significantly impacts the hutch's durability, appearance, and longevity. Softwoods like pine or fir are readily available, affordable, and relatively easy to work with, making them ideal for beginners. However, they are slightly softer and may dent or scratch more easily than hardwoods. Hardwoods such as oak or maple offer superior strength, resilience, and a more refined aesthetic, but they are more expensive and demand more experience in woodworking. Choose lumber that is properly dried (kiln-dried is preferred) to minimize warping and cracking during and after construction. Ensure the lumber is free of significant knots, splits, or other defects that could compromise the structure's integrity. Calculate the required board feet based on your design and purchase additional lumber to account for potential waste and mistakes.

1.3 Gathering Necessary Tools and Hardware

Before starting, gather all necessary tools and hardware. This will ensure a smooth and efficient workflow. The essential tools include:

  • Measuring tape
  • Pencil
  • Saw (circular saw, miter saw, or hand saw)
  • Drill with various drill bits
  • Screwdriver (both Phillips and flathead)
  • Clamps (various sizes)
  • Sandpaper (various grits)
  • Wood glue
  • Safety glasses
  • Ear protection
  • Level
  • Wood plane (optional, but helpful for smoothing surfaces)

The necessary hardware includes:

  • Wood screws (various lengths and sizes)
  • Cabinet hinges (if incorporating cabinets)
  • Door knobs or handles
  • Shelf supports (metal or wooden)
  • Wood filler (to fill any screw holes or imperfections)

Phase 2: Construction of the Hutch Frame

2.1 Cutting the Lumber to Size

Using your meticulously crafted design and measurements, accurately cut the lumber to the required dimensions. Use a sharp saw to ensure clean cuts that minimize splintering. Remember to account for the thickness of the wood when calculating the dimensions of joints and components. For example, if a shelf is to be 12 inches wide, and the side supports are 1 inch thick, you will need to cut the shelf to 10 inches to accommodate both side supports.

2.2 Assembling the Main Frame

Construct the main frame of the hutch by joining the side pieces, top piece, and bottom piece using wood glue and screws. Pre-drill pilot holes before driving in the screws to prevent the wood from splitting. Use clamps to hold the pieces firmly in place while the glue dries. Ensure the frame is square and true using a level and measuring square. Allow the glue to cure completely according to the manufacturer's instructions.

2.3 Adding Shelves and Supports

Once the main frame is assembled and the glue is dry, install the shelves and their supporting brackets. Measure and cut the shelves to the desired dimensions. If using shelf supports, attach them to the inside of the frame at the desired heights. Ensure the shelves are level and securely attached. For added strength and stability, you can also use dowels or pocket holes for shelf support. Consider adding decorative molding to the shelf edges for an enhanced aesthetic.

Phase 3: Cabinet Construction (Optional)

3.1 Building the Cabinet Boxes

If your design includes cabinets, construct the boxes using the same techniques as the main frame. Remember to account for the space required for the doors and hinges. Ensure the boxes are square and true before moving on to the next step.

3.2 Installing Doors and Hardware

Once the cabinet boxes are assembled, attach the doors using appropriate hinges. Precise alignment is crucial to ensure proper door function and aesthetic appeal. Install the door knobs or handles, ensuring they are securely fastened and functional. For glass-fronted cabinets, consider using decorative trim to frame the glass.

Phase 4: Finishing Touches

4.1 Sanding and Smoothing

Thoroughly sand all surfaces of the hutch using various grits of sandpaper, starting with a coarser grit to remove any imperfections, gradually progressing to finer grits for a smooth finish. Pay close attention to edges and corners. Careful sanding is essential for a smooth paint or stain application.

4.2 Applying Finish

Apply your chosen finish. Options include paint, stain, or a combination of both. Follow the manufacturer's instructions for each product. Multiple thin coats are generally preferable to one thick coat. Allow adequate drying time between coats. A clear sealant can protect the finish and enhance its durability.

4.3 Adding Decorative Elements

Finally, add any decorative elements such as crown molding, turned legs, or decorative hardware. These details enhance the overall aesthetic of the hutch and provide a unique touch. Ensure all elements are securely attached.

Conclusion

Constructing a charming country hutch is a rewarding project that requires careful planning, precise execution, and attention to detail. By following these steps and taking your time, you will create a beautiful and functional piece that adds charm and character to your home. Remember to always prioritize safety and use appropriate safety equipment throughout the entire process. Enjoy the process and the satisfaction of building something beautiful with your own hands.

Smart Storage Woodworking Plans for a Clutter-Free Shop

Posted by myname with No comments

Smart Storage Woodworking Plans for a Clutter-Free Shop

A well-organized woodworking shop is not merely aesthetically pleasing; it's a fundamental element of efficiency and safety. Clutter impedes workflow, increases the risk of accidents, and ultimately diminishes the enjoyment of the craft. This article details comprehensive woodworking plans for implementing smart storage solutions, transforming your workshop from a chaotic space into an efficient and productive environment. These plans emphasize maximizing space utilization, prioritizing accessibility, and promoting a system of organization that minimizes time wasted searching for tools and materials.

Planning Your Storage System

Before constructing any storage solutions, meticulous planning is paramount. A poorly planned system can be as ineffective as having no system at all. This phase involves a thorough assessment of your current inventory, anticipating future needs, and carefully considering the layout of your workspace.

Inventory Assessment:

Begin by creating a detailed inventory of your tools, materials, and supplies. Categorize items logically – hand tools, power tools, fasteners, lumber, finishes, etc. This inventory will inform the design of your storage system, ensuring that you have adequate space for everything.

Space Optimization:

Analyze your workshop's dimensions and identify all available storage space. Consider both vertical and horizontal space. Walls, ceilings, and even the backs of doors offer valuable storage opportunities often overlooked. Measure these areas carefully to determine the dimensions of your storage units.

Accessibility and Workflow:

Prioritize the placement of frequently used tools and materials within easy reach. Tools used daily should be stored closer to your primary workbench. Less frequently used items can be stored in higher or less accessible locations. The flow of your workflow should dictate the placement of your storage units. Avoid creating bottlenecks or unnecessary movements between workstations.

Constructing Your Storage Solutions

With your plan in place, you can begin constructing your storage solutions. These plans offer a variety of options, from simple shelving units to more complex cabinets and wall-mounted organizers.

Basic Shelving Units:

Shelving units are the backbone of most woodworking storage systems. They are versatile, relatively easy to construct, and can be customized to fit specific needs. Consider using sturdy lumber like 2x4s or 2x6s for the framework and plywood or MDF for the shelves. Ensure the shelves are adequately spaced to accommodate your various items. Consider adding adjustable shelving for greater flexibility.

Materials:

  • 2x4 lumber for framing
  • Plywood or MDF for shelving
  • Wood screws
  • Wood glue
  • Level
  • Measuring tape
  • Drill
  • Saw

Wall-Mounted Cabinets:

Wall-mounted cabinets offer a space-saving alternative to freestanding units. They are especially useful for storing smaller items, keeping them organized and easily accessible. Design your cabinets to fit the available wall space and ensure that they are securely fastened to wall studs for stability. Consider using cabinet hinges and doors for added protection from dust and damage.

Materials:

  • Plywood or MDF for cabinet construction
  • Cabinet hinges
  • Cabinet knobs or handles
  • Wood screws
  • Wood glue
  • Wall anchors (if necessary)

Specialized Storage Solutions:

Consider specialized storage solutions to optimize organization for specific items. These include:

  • Drawer systems: For small tools, fasteners, and other loose items.
  • Pegboards: For hanging hand tools and other items.
  • Rolling carts: For transporting tools and materials between workstations.
  • Overhead storage: For less frequently used items, such as large sheets of plywood or lumber.
  • Vertical lumber racks: To keep lumber organized and prevent warping.

Optimizing Your Storage System for Efficiency

Beyond merely building storage solutions, the key to a clutter-free shop lies in implementing an efficient system for organization and maintenance. This involves thoughtful labeling, regular purging, and a commitment to consistent organization.

Clear and Concise Labeling:

Label all storage containers and shelves clearly and concisely. Use a consistent labeling system that makes it easy to locate specific items. Consider using labels that are durable and easy to read.

Regular Purging and Maintenance:

Periodically purge your storage areas of unused or obsolete items. This prevents clutter from accumulating and ensures that your workspace remains efficient and safe. Regularly clean and maintain your storage units to prevent damage and ensure their longevity.

Utilizing Vertical Space:

Maximize vertical space by using overhead storage, tall cabinets, and wall-mounted shelves. This frees up valuable floor space and allows for a more organized and efficient layout.

Implementing a "One-In, One-Out" Policy:

Adopt a "one-in, one-out" policy for your tools and materials. For every new item acquired, remove an old or unused item. This prevents unnecessary accumulation and keeps your workshop free from clutter.

Conclusion

Creating a clutter-free woodworking shop is a process of planning, construction, and ongoing maintenance. By implementing the storage solutions and organizational strategies outlined in this article, you can transform your workshop from a chaotic space into an efficient, productive, and safe environment. Remember, a well-organized shop is not just about aesthetics; it is a crucial element for enhancing your woodworking experience and maximizing your productivity.