Monday, April 14, 2025

How to Build a Wood Pallet Bar: Easy DIY Tutorial

Posted by myname with No comments

How to Build a Wood Pallet Bar: Easy DIY Tutorial

Transforming discarded wood pallets into a stunning, functional bar is easier than you think! This detailed DIY tutorial guides you through each step, from sourcing materials to adding the finishing touches. Prepare to impress your guests with this unique and budget-friendly addition to your home or outdoor space. Get ready to unleash your inner craftsman and create a conversation-starting centerpiece.

Gathering Your Supplies

Before you begin, gather all necessary materials. This project requires a few key components and some optional extras to personalize your bar. Remember to prioritize safety and wear appropriate protective gear, including safety glasses and gloves, throughout the entire process.

Essential Materials:

  • Two sturdy wood pallets: Choose pallets in good condition, free from rot or excessive damage. Inspect them carefully before starting.
  • Wood cleaner and sandpaper: Thoroughly clean the pallets to remove dirt, debris, and any potential splinters. Sanding smooths the surfaces for a polished look and prevents injuries.
  • Wood stain or paint: Select a stain or paint that complements your existing décor. Consider a protective sealant afterwards to extend the life of your bar.
  • Screws and a drill: Use screws appropriate for the wood type. A drill makes the process significantly faster and easier.
  • Hinges: You'll need these to connect the pallet sections if you're building a folding bar.
  • Optional: Cabinet knobs or pulls for added style, shelves for extra storage, a countertop (e.g., butcher block, reclaimed wood), and bar accessories (e.g., bottle opener, coasters).

Constructing Your Pallet Bar

Now for the fun part! Follow these steps to assemble your unique bar. Remember to take your time and double-check measurements for a professional finish.

Step 1: Cleaning and Preparation

Begin by thoroughly cleaning your pallets. Use a stiff brush and wood cleaner to remove any dirt, debris, or loose wood. Once dry, carefully sand all surfaces to create a smooth finish, paying close attention to any rough edges or splinters. This step is crucial for both aesthetics and safety.

Step 2: Staining or Painting

Apply your chosen stain or paint according to the manufacturer's instructions. Allow ample drying time between coats for optimal coverage and durability. Consider applying a sealant after the paint or stain has fully cured to protect your bar from spills and the elements (especially if using it outdoors).

Step 3: Assembling the Bar

Depending on your design, you might need to connect the pallets using screws and hinges. If creating a folding bar, carefully attach the hinges to the sides of the pallets, ensuring they align correctly. If using a single pallet, you may wish to add additional supports for stability. Pre-drill pilot holes before screwing to prevent the wood from splitting.

Step 4: Adding Finishing Touches

Now comes the personalization stage! Install any shelves, knobs, or pulls you've chosen. You might also want to add a countertop for a more professional and convenient bar experience. Let your creativity guide you!

Finishing and Enjoying Your Creation

Once your bar is assembled, stand back and admire your handiwork! You've successfully transformed simple pallets into a stylish and functional addition to your home. Now it's time to stock it with your favorite beverages and invite your friends over for a celebratory drink. Congratulations on your DIY success!

Building a Simple Podium: Easy Plans for DIY Enthusiasts

Posted by myname with No comments

Building a Simple Podium: Easy Plans for DIY Enthusiasts

Constructing a podium may seem like a daunting task, but with a well-defined plan and readily available materials, even novice DIY enthusiasts can successfully build a functional and aesthetically pleasing structure. This guide provides comprehensive instructions, encompassing material selection, precise measurements, step-by-step assembly, and finishing techniques, ensuring a rewarding and successful project.

Planning and Material Selection

Before commencing the construction process, meticulous planning is crucial. This phase involves determining the desired dimensions of the podium, selecting appropriate materials based on both functionality and aesthetic preferences, and compiling a comprehensive list of necessary tools. Careful consideration of these factors will significantly streamline the building process and enhance the final product's quality.

Determining Podium Dimensions

The dimensions of your podium will largely depend on its intended use and the anticipated audience. Consider the height required for comfortable speaking engagement, allowing sufficient space for a lectern or microphone, and ensuring adequate stability. A typical podium height ranges between 36 and 48 inches, with a surface area of approximately 24 inches by 24 inches. However, these dimensions are adaptable to suit specific needs. Detailed sketches or diagrams can prove invaluable in visualizing the final product and refining dimensions before purchasing materials.

Material Selection: A Balancing Act of Aesthetics and Functionality

The choice of materials significantly influences both the aesthetic appeal and the structural integrity of the podium. Wood remains a popular choice, offering a range of options from readily available pine to more durable hardwoods like oak or maple. The selection depends on budget constraints and desired visual impact. Plywood offers a cost-effective alternative, providing strength and stability while facilitating easier construction. For a more modern aesthetic, consider using MDF (medium-density fiberboard), which can be easily painted or stained. Regardless of the selected material, ensure it is of sufficient thickness to provide the necessary structural support and withstand regular use.

Essential Tools and Equipment

Gathering the necessary tools beforehand ensures a smooth and efficient construction process. The following tools are essential for building a simple podium:

  • Measuring tape
  • Pencil
  • Circular saw or hand saw
  • Drill with various drill bits
  • Screwdriver (both Phillips and flathead)
  • Wood glue
  • Clamps
  • Sandpaper (various grits)
  • Safety glasses
  • Wood finish (paint, stain, varnish)
  • Level
  • Square

Having these tools readily available minimizes interruptions during the construction process and contributes to a more efficient workflow.

Construction Process: A Step-by-Step Guide

The construction process comprises several key stages, each requiring careful attention to detail. Adhering to the specified steps ensures the structural integrity and longevity of the finished podium.

Building the Base

The base provides structural support for the entire podium. For a simple rectangular base, cut four pieces of your chosen material to the desired length and width. These will form the sides of the base. Cut two additional pieces for the top and bottom of the base. Assemble the base using wood glue and screws, ensuring all corners are square and the base is level. Clamp the pieces together while the glue dries to ensure a strong and secure bond.

Constructing the Top Panel

The top panel serves as the speaking surface. Cut a piece of your chosen material to the desired dimensions, ensuring it is slightly larger than the base to allow for an overhang. Attach the top panel to the base using wood glue and screws, ensuring it is securely fastened and level. You may wish to reinforce the connection with corner braces for added stability.

Assembling the Sides and Back Panel (Optional)

For a more finished look, you can add side and back panels. Cut these to the desired height and width, ensuring they fit snugly against the base and top panel. Attach these using wood glue and screws. Consider adding decorative molding or trim for a more polished aesthetic.

Sanding and Finishing

Once the podium is fully assembled, thorough sanding is essential to ensure a smooth surface. Begin with coarser grit sandpaper to remove any rough edges and gradually progress to finer grits for a smooth finish. After sanding, apply your chosen wood finish. This could be paint, stain, or varnish, depending on your preference and the desired aesthetic. Apply multiple coats, allowing each coat to dry completely before applying the next.

Adding Enhancements and Refinements

While a simple podium can be highly functional, adding enhancements can elevate both its appearance and usability. These enhancements can range from minor decorative touches to more significant functional additions.

Incorporating a Lectern

A lectern provides a convenient resting place for notes or a microphone. A simple lectern can be constructed from the same material as the podium. Cut a slanted panel and attach it securely to the top panel. Ensure the angle of the lectern is comfortable for the speaker.

Adding a Microphone Holder

For presentations requiring amplification, integrate a microphone holder. This can be a simple clamp-on holder or a more integrated design. Ensure that the microphone holder is securely attached and positioned for optimal sound quality.

Applying Decorative Elements

Enhance the aesthetic appeal with decorative elements such as molding, trim, or even inlaid designs. These additions can personalize the podium and make it a unique piece.

Conclusion: A Testament to DIY Ingenuity

Building a simple podium is a rewarding DIY project that combines practicality with creative expression. By following these detailed instructions, paying close attention to measurements and assembly techniques, and applying a quality finish, you can create a functional and aesthetically pleasing podium tailored to your specific needs. Remember to prioritize safety throughout the construction process, wearing appropriate protective gear. The result is a testament to the power of DIY ingenuity, a functional and personalized addition that will undoubtedly enhance any presentation or event.

DIY Valet Woodworking Projects for Small Spaces

Posted by myname with No comments

DIY Valet Woodworking Projects for Small Spaces

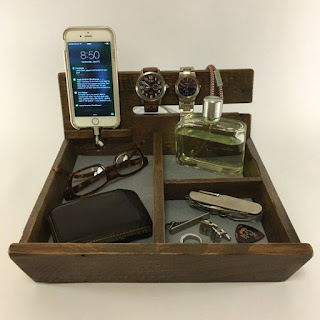
The modern home, particularly in urban environments, often prioritizes space optimization. This necessitates creative solutions for storage and organization, and a valet stand, while seemingly a luxury item, can become a surprisingly practical and space-saving addition. This article explores several DIY valet woodworking projects tailored for small spaces, emphasizing efficient design and maximizing functionality within limited dimensions.

Designing for Small Spaces: Key Considerations

Before embarking on any woodworking project, careful planning is paramount. For small spaces, this is especially crucial. The following considerations are key to successful valet stand design:

Minimizing Footprint

The primary goal is to minimize the stand's overall footprint. This can be achieved through several strategies. Consider a narrow, tall design instead of a wide, shallow one. A slim profile allows the valet to fit snugly into a corner or against a wall without overwhelming the room. Explore designs that maximize vertical space, utilizing multiple tiers for clothing and accessories.

Multi-Functionality

Incorporating additional functionality into the design increases the valet's value. Consider adding features such as:

  • Built-in drawers: Small drawers can provide storage for smaller items like jewelry, watches, or cufflinks.
  • Shelves: Open shelving can be used for folded garments or accessories.
  • Hooks: Strategically placed hooks can accommodate bags, scarves, or belts.
  • Mirror integration: A small mirror can be incorporated into the design for added convenience.

Material Selection

The choice of wood significantly impacts the final product's aesthetics and durability. Consider these factors:

  • Hardwoods: Offer superior durability and a refined look. Examples include oak, maple, and cherry. However, hardwoods are generally more expensive.
  • Softwoods: More affordable and easier to work with, but might not be as durable. Pine and fir are common choices for DIY projects.
  • Plywood: A cost-effective option with good strength-to-weight ratio. Consider using plywood for the base and internal components to minimize weight and cost.

Style and Aesthetics

The valet stand should complement the existing décor of the room. Consider the overall style of your home – modern, traditional, rustic – and choose a design that harmonizes with it. The finish also plays a vital role in the final appearance; staining, painting, or leaving the wood natural are all viable options.

DIY Valet Stand Projects for Small Spaces

Here are three distinct DIY valet stand projects suitable for small spaces, each with varying levels of complexity:

Project 1: The Minimalist Valet

This project focuses on simplicity and efficiency. It consists of a narrow, freestanding unit with a single garment rod, a small shelf, and a few hooks. The materials required include: a narrow piece of wood for the base, a dowel or rod for the garment rack, small wooden blocks for shelf supports, hooks, and wood glue, screws, and stain or paint.

The construction involves attaching the base to the shelf supports, mounting the garment rod securely, and affixing the hooks. This project is ideal for beginners and can be completed within a weekend.

Project 2: The Multi-Tiered Valet

This project incorporates multiple tiers to maximize storage capacity. The design can include two or three shelves, a garment rod, and hooks. Materials required are similar to the minimalist valet, but with additional lumber for the shelves and potentially a more elaborate base.

Constructing this project requires careful measurement and precise cuts to ensure stability and alignment. Dovetail joints or robust dowel joints are recommended for added strength.

Project 3: The Corner Valet

This project maximizes corner space by utilizing a triangular or L-shaped design. It typically includes a garment rack, a small shelf, and hooks. This design requires more precise planning and cutting, particularly when creating the angled supports. Materials include lumber for the base and shelves, a garment rod, and potentially specialized corner brackets for enhanced stability.

This project is suitable for intermediate woodworkers who are comfortable working with angles and more complex joinery techniques. Miter cuts and robust joinery are crucial to ensure stability and longevity.

Advanced Considerations

For those seeking more advanced projects, consider incorporating these features:

Hidden Storage

Integrate drawers or compartments within the valet stand to conceal items such as accessories or folded clothing. This requires careful planning and precise joinery to create smoothly functioning drawers.

Customizable Features

Incorporate features such as adjustable shelves or removable components to cater to changing storage needs. This adds a layer of complexity to the design, but significantly enhances the valet's adaptability.

Integrated Lighting

Adding small LED lights can enhance the valet's functionality and aesthetics, particularly if incorporated within the shelves or around the garment rod. This requires working with electrical components, so proper safety precautions are essential.

Conclusion

Designing and building a DIY valet stand for a small space presents a rewarding woodworking challenge. By carefully considering the design elements discussed above and selecting a project that aligns with your skill level, you can create a functional and aesthetically pleasing piece of furniture that enhances the organization and style of your home. Remember to prioritize safety and accuracy throughout the construction process to ensure a durable and long-lasting valet stand.